This is a long, quite graphic intensive blog entry, all about getting the Huawei E5830 Mobile Wifi/Broadband dongle to work with the Apple Newton. The equipment used in this blog is :
- Apple MessagePad 2000U
- 2Wire PCMCIA wifi card (made by NEC; rebadged Lucent Wavelan Gold)
- Huawei E5830
- Sony PCG-FX401 laptop running Windows XP Home
Software used in the blog is :
- Newton OS 2.1
- the Newton networking stack (Devices, NIE etc.)
- Hiroshi’s wireless driver for the Newton
- I have installed the Kallisys Lantern Patch and the More Wifi Cards packages; you may or may not need them depending on your particular wifi card
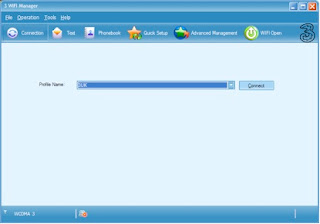
- 3’s 3 Wifi Manager on the Windows PC

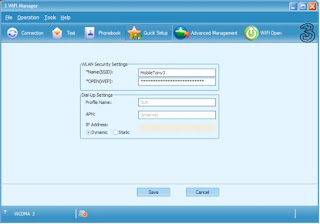
or the Quick Setup page, which will look a bit like this :

As I mentioned before, I’m quite happy with 3, so won’t be changing either the Dial-Up Settings or the Connection profile. What we will want to change, however, are the WLAN Security Settings. As delivered from 3, the E5830 is set up with an SSID which will be something like “3Wireless-Modem-1234” and with a “Wifi Key” which will be something like “0123ABCD”. For a start, the SSID makes it pretty obvious what you’re using, and for seconds the “Wifi Key” is actually a WPA-PSK key – which is useless for the Newton, where wifi encryption stops at 128-bit WEP, so you’re going to have to sort that out too. With that in mind, click on “Advanced Management”, which is where the wifi setup action is.
This is the first pane you’ll see, which is the WLAN Settings -> Basic Settings page.

This is where you’ll set up the basic parameters for your wireless network. From the top of the list on the Basic Settings pane, the settings are as follows:
- the SSID is essentially the name of your wireless network.
- Channel is the wireless channel your wireless network will operate on; there are between 11 and 13 channels available, depending on where you are in the world, but there are really only 3 which won’t overlap with each other to some extent (IIRC they are 1, 7 and 11). Leave it set to 1, unless it proves impossible to get a signal; then you might want to change it. (I have mine set to 11, as I already have a wireless segment at home on channel 1.)
- 802.11 Mode sets up which modes your wifi hotspot will work with. 802.11b is the old 11Mb/s mode; 802.11g is the newer 54Mb/s mode. You’ll have to have either 802.11b only or 802.11b/802.11g enabled to get your Newton to work with the device, as I don’t think any of the cards that work with a Newt can run 802.11g. If you want to use devices other than your Newt with the wifi hotspot (a PlayStation Portable, or a Mac with a later Airport card say) use the 802.11b/802.11g mixed mode, or if it’ll only ever be used with a Newton you can use 802.11b only.
- Leave Rate set to Auto – this way, the wifi hotspot and your Newton can negotiate an appropriate speed setting (up to the maximum permitted by the 802.11 Mode set above and the capabilities of your wifi card) between them when you connect, depending on the quality of connection they can achieve.
- MaxAssociateNum is the maximum number of devices you’re going to allow to attach to your wifi hotspot at the same time, between 1 and 5.
- If you tick SSID Broadcast Hide, then the wireless network name will not be broadcast so won’t be picked up by any scanning devices (they’ll see your network, but won’t associate a name with it).
Once you're finished here, hit Save. Next, you should set up a wireless key in the WLAN Settings -> Security Settings window, which looks like this :

802.11 Authentication sets the basic method the devices in your wireless network will use to at least give you the illusion of security. If you’re going to use a Newton, this entry should be set to OPEN. I repeat, this should be set to OPEN. I went for a long time feeling like a complete moron for not being able to get wifi working with my Newt, even though I had appropriate wireless cards and everything else set correctly, until I switched from SHARED to OPEN by accident one day, and all of a sudden everything started to work. (Digression: if I remember correctly, if this is set to SHARED, then devices joining a network will initiate a handshake to compare the WEP key they hold to make sure they match. The Newton won’t do this handshake, so even if you have the correct key, you won’t get on to the network. In OPEN mode, the devices just pile in, and hopefully they can communicate with each other… Using OPEN mode is in one way slightly more secure, because there is no handshake for any ne’er-do-wells to watch out for on your network; however, given the inherent flaws of WEP security, this is “more secure” in much the same way that slashing at your wrists with a blunt razor is “more safe” than slashing at them with a sharp one.) Next, you should set your encryption mode to WEP, and then in each of the WEP Key 1 – 4 fields, set a WEP key. The WEP key is just a long string of hexadecimal digits – pick anything you like, there is no “wrong” setting here. The length of key you set will vary depending on what sort of WEP encryption your wireless card can handle (the Newton is very much the lowest common denominator in all of these settings, as you will have noticed – even a PSP can do WPA, after all…) If you have wireless card that doesn’t do encryption at all, buy another card. If you have a Wavelan Silver or equivalent that does 64-bit security, you’ll have a shorter key here. The key length I have set up here is for 128-bit, or Wavelan Gold standard.
Digression: Not sure what your card will do ? If it’s a Wavelan knock-off, then there will probably be a label on the back with an “Encryption:” entry. If it your cards panel looks like this :
then it’s a basic 64-bit WEP card and you should use a shorter key; if it looks like this :
then it’s 128-bit and you use a longer one. If it looks like this :
then it’s a token ring card – forget it ! ;) Sadly, the Netgear and Linksys cards that I have offer no external clues as to their encryption capabilities at all, so as ever Google is your friend…!
Once you have made the settings you want, hit the Save button. You’ll be taken back to the main window again …
You can now shutdown the Windows PC – your E5830 should now be set up, so it’s time to get the Newton out and get it configured to talk to it.
First thing to do is to insert your wireless card. You’ll get a slip that looks something like this : 
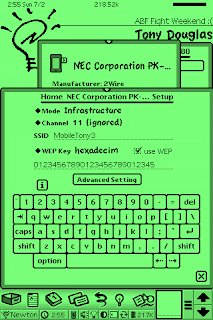
(This slip is for a card badged 2Wire; listed as an NEC card, and is actually a Wavelan Gold knock-off !) Take a note of the name in large Casual font (the part that starts “NEC Corporation PK-…” here) as you’ll need to know it later on in the process. Click on the Setup button, and you should see a settings slip like this :
Here, you should make sure the SSID matches exactly the SSID you set on your E5830, and similarly you should make sure that you have clicked the Use WEP checkbox, have set the WEP Key to “hexadecimal” and the key (shown here as ‘012345…’) matches exactly what you entered in the WEP key field on the E5830. I’m not 100% sure if these fields are case sensitive or not, but it’s probably safest to assume they are and treat them accordingly. Close this slip, and go to Internet Setup to create a setup for this card. You should get a slip rather like this :
(mine has setups for each card I might insert, and I have a few of them !) We’ll want to create a new setup, so tap New, and select Generic Setup. You should get a slip like this : 
Wifi is a wireless Ethernet connection, so select the Ethernet option here, then tap Continue. You should then see :
Here, you give your setup a name, describe how the setup should obtain an IP address and set which card type the setup will use. We can give the setup any name we like (although making it somewhat descriptive will help !), and we should set it up to use the card we inserted – use the note you took of the card’s name earlier on to select the correct value in the pick list you’ll get when you tap on “Card”. The E5830 will by default act as a DHCP server, so you should leave Configuration set to DHCP Server – otherwise, you’ll have to manually enter IP address information for your card, for your gateway, for your DNS servers etc. etc. which is frankly error prone and a pain in the butt. DHCP is useful – use it :) Filling out this slip should end up with something that looks like this :
Tap continue, and you’ll get the last slip which looks like this :
I have never entered anything into this slip in any of the Internet Setups I’ve created while using a Newton. I assume it’s something to do with the default domain name for DNS, but I’m not really sure. Anyway, leave it blank, and tap Done. You have now created a new Internet setup for your card, and the Internet Setup slip confirming your settings which should look rather like this :
Congratulations, you’re done. You can now use the Shiny New Setup when you’re making an internet connection and you’ll get to the web via your E5830. If something goes wrong, more thank likely you’ve got a typo somewhere in the key or in the SSID, so go back and trace your steps carefully. So long as the SSIDs and keys match, you shouldn’t bump into any problems here.
You do, though, also have to pay attention to the LEDs on the top of the E5830. There are 5 of them. The main four are laid out in a square, as follows :
Top left is a bar graph in a circle; this tells you if you can see the 3 network. It should preferably show green (good network) or amber (network visible but not so good), but if it’s solid red you may well still get onto the Internet (whatever the booklet with your E5830 says !) If it’s flashing red, it’s either trying to find a network, or your SIM card isn’t in correctly.
Top right is the battery indicator; it goes from green (good) to amber (not so good) to red (not good at all) to flashing red (about to run out of juice).
Bottom left is the Wifi indicator; this should be a blue W in a circle. If there’s no light here, press the middle button on the right hand side of the E5830 to switch the wifi hotspot on.
Bottom right is the broadband indicator; this is an M in a circle which can show multiple colours. Nothing at all means not connected; flashing blue means it can see a network but isn’t on it; flashing green means it’s in the process of connecting; dark blue means it’s connected to the network, but not at high speed; solid pale blue means on the network at high speed.
Right in the middle of the square is the Roaming indicator, which is an R in a circle. It will show red if your E5830 connects up to a non-3 network. According to 3, this will never happen in the UK. According to me, this is tosh, as I’ve seen mine display the roaming indicator several times.
So, there you have it. A blow by blow account of how I got my Newton to talk to my E5830. Now, if only someone could tell me how to get my MailV set up to work without going bananas for more than 3 days at a time, I'd be blissfully happy !!


No comments:
Post a Comment